Free Home Theatre Design And Installation
Understanding Your Space: Initial Considerations
Before embarking on a home theatre project, it’s vital to evaluate your available space. Consider room dimensions, ceiling height, and existing furniture layout. This foundational step ensures you optimize your design for both aesthetics and functionality. The walls’ color and texture can influence sound dynamics, thus, select materials that enhance audio quality. Furthermore, assess potential light sources to minimize glare on your screen. Decide if you’ll need blackout curtains or specialized paint to create a dark environment. Think about foot traffic and seating plans to ensure everyone has a great view. By addressing these aspects, you lay a strong groundwork for a theatre experience tailored to your home’s unique characteristics.
Essential Components for a Home Theatre Setup
A successful home theatre setup requires several key components working in harmony. First, the display device—typically a high-definition television or a projector with a screen—serves as the visual centerpiece. Then, consider your audio solution; this often involves a surround sound system with strategically placed speakers and a powerful subwoofer. A modern AV receiver acts as the central hub, connecting audio and video components. Seating is crucial for comfort over long movie marathons, so choose recliners or a sectional that offers ample support. Don’t forget cables and connections, such as HDMI and optical cords, that ensure seamless communication between devices. Investing in these essentials can transform any room into a dedicated entertainment paradise.
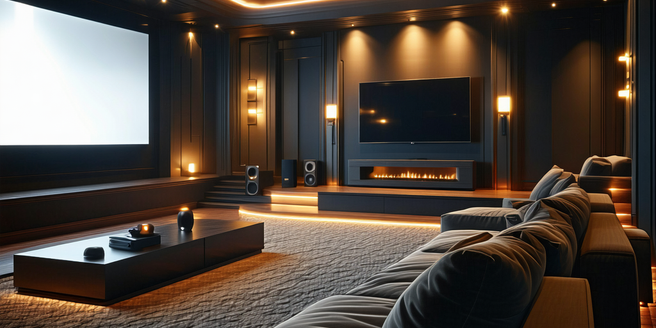
Creating the Perfect Audio Environment
Audio plays a pivotal role in delivering an immersive home theatre experience. For superior sound quality, consider the room’s acoustics when designing your setup. Utilize insulation materials and acoustic panels to manage sound reflections and reverberations. The layout of your speakers affects the sound stage, so adhere to recommended configurations like a 5.1 or 7.1 surround system. Experiment with speaker angles and heights to find the sweet spot where audio feels vibrant and balanced. Make sure your subwoofer is properly calibrated; its placement can drastically influence bass response. Investing time in optimizing these elements ensures your audio environment enhances every viewing experience, providing clarity and depth that bring movies to life.
Lighting Tips for an Immersive Experience
Effective lighting is crucial for a true home theatre experience, impacting not only the ambiance but also visual clarity. Start by minimizing natural light with blackout curtains or blinds to prevent screen glare. Incorporate dimmable lighting solutions to control the room’s ambiance; recessed or wall-mounted fixtures offer subtle illumination without overpowering the screen. Use LED strip lights along the floor or seating area for low-level lighting that aids mobility without spoiling the cinematic atmosphere. Consider bias lighting behind your screen, reducing eye strain and improving perceived contrast. By thoughtfully planning your room’s lighting, you enhance the overall immersion, ensuring your focus remains on the performance.
DIY Installation: Tools and Techniques
Embarking on a DIY installation for your home theatre can be a rewarding challenge. Begin with the right tools: a power drill, stud finder, cable conduit, and mounting hardware are essentials. Start by mapping out your space and marking speaker and display positions. When mounting speakers, use the stud finder to secure them to wall studs, ensuring stability. Cable management is crucial; utilize conduits to hide wires and maintain a neat finish. Proper calibration is key, so make use of built-in systems in your receiver to set sound levels and distances. Always follow safety guidelines, especially when handling electrical connections. With meticulous planning and execution, a DIY installation can yield professional-quality results.
Testing and Optimizing Your Home Theatre System
Once your home theatre system is installed, thorough testing and optimization are critical to ensuring all components perform optimally. Start by running test materials that include a range of audio frequencies and video resolutions to check for clarity and performance. Calibrate the visual settings on your display device for color accuracy and contrast using test patterns. Use a sound level meter or built-in apps to fine-tune speaker levels and balance, adjusting for your room’s acoustics. Verify that all connections are secure; loose cables can degrade performance. Consider periodic updates to firmware or software to maintain compatibility with new formats and features. Through careful testing, you can optimize your system for a superior entertainment experience.